 Introduction
Welcome everybody! I find most tutorials out there are really good, but sometimes they leave out some better ways to do one part of the tutorial or I just find nobody really explains how to do various little things. That's why I started this blog, I wanted to post various tips, tricks and tutorials on how to do various tasks that all Cocoa Programmers go through and at the same time get discussions going on everything in Cocoa to help everybody out. I believe that by doing this I help you and myself at the same time.
In everything I do I also believe in the term Wil Shipley first used* "Code Samurai." By that I mean that you try and hold yourself to high coding standards and always are striving to master Cocoa.
[Tutorial] Prototyping Interfaces with Interface Builder
For my first tutorial im going to start out simple with an app I initially gave to one of my friends to do, but he
Introduction
Welcome everybody! I find most tutorials out there are really good, but sometimes they leave out some better ways to do one part of the tutorial or I just find nobody really explains how to do various little things. That's why I started this blog, I wanted to post various tips, tricks and tutorials on how to do various tasks that all Cocoa Programmers go through and at the same time get discussions going on everything in Cocoa to help everybody out. I believe that by doing this I help you and myself at the same time.
In everything I do I also believe in the term Wil Shipley first used* "Code Samurai." By that I mean that you try and hold yourself to high coding standards and always are striving to master Cocoa.
[Tutorial] Prototyping Interfaces with Interface Builder
For my first tutorial im going to start out simple with an app I initially gave to one of my friends to do, but he was lazy didn't have time. But I wanted bad enough (even though I wouldn't use it that often) that I did it myself in a few minutes. I called it LicenseKeeper and all it does is store licenses to various applications you have and allow you to sort through them and perform live searches, and add your own notes all with 0 lines of code**. And now i'll show you how to make this app.
First off launch Xcode and create a "Core Data Application." File -> New Project
 Call the application LicenseKeeper and save it where you want.
The Data Model
In Core Data you don't create Instance Subclasses to create objects, you create Entities and use the data model to define the structure of the entity. So now double click the LicenseKeeper_DataModel.xcdatamodel file on the source list to the left so it opens the data model in it's own window.
Call the application LicenseKeeper and save it where you want.
The Data Model
In Core Data you don't create Instance Subclasses to create objects, you create Entities and use the data model to define the structure of the entity. So now double click the LicenseKeeper_DataModel.xcdatamodel file on the source list to the left so it opens the data model in it's own window.
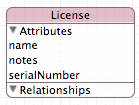 Now we'll just create one Entity "License." Click on the + icon in the Entities table and name the Entity "License." Then on the properties pane just to the right click on the "+" button and click on Add Attribute, then do this 2 more times. Name the attributes "name", "serialNumber" and "notes." Define all 3 of these to be Strings from the popup button in the detail pane or in the table itself.
Next open the MainMenu.nib file by double clicking it in the source list and drag the window (height wise) to be bigger by a few inches. Now (heres the tricky part) just click the data model window and move it over so you can see the window in Interface builder and the entity in the data model. Got it? Good.
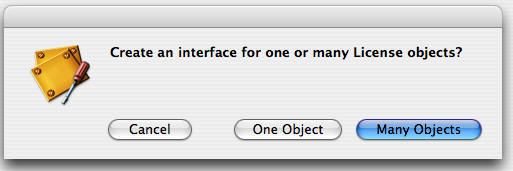
Now hold down the alt/option key and drag the entity from the data model window to the interface builder window you just resized. As soon as you let go Interface Builder will ask you if you want to prototype the interface for one object or many objects. Select Many Objects.
Now we'll just create one Entity "License." Click on the + icon in the Entities table and name the Entity "License." Then on the properties pane just to the right click on the "+" button and click on Add Attribute, then do this 2 more times. Name the attributes "name", "serialNumber" and "notes." Define all 3 of these to be Strings from the popup button in the detail pane or in the table itself.
Next open the MainMenu.nib file by double clicking it in the source list and drag the window (height wise) to be bigger by a few inches. Now (heres the tricky part) just click the data model window and move it over so you can see the window in Interface builder and the entity in the data model. Got it? Good.
Now hold down the alt/option key and drag the entity from the data model window to the interface builder window you just resized. As soon as you let go Interface Builder will ask you if you want to prototype the interface for one object or many objects. Select Many Objects.
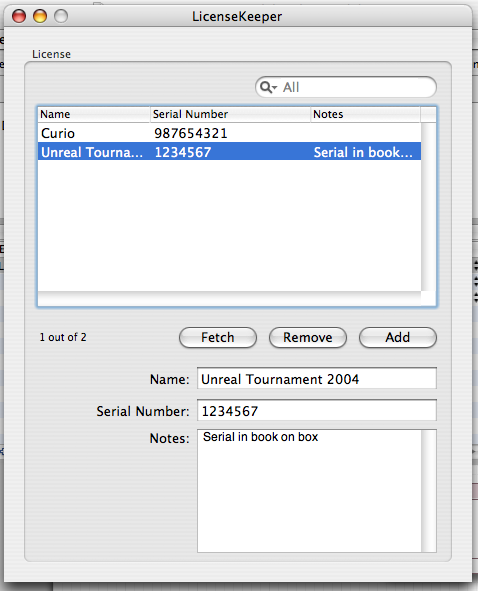
 Assuming you did everything correctly you should end up with an interface looking like this
 Now this interface is really good even for a basic application, it obviously has some quirks. For starters Interface Builder lists your attributes in alphabetical order and so the license key and the notes should be switched around in the table and the detail part of the view.
So first off you'll have to double click inside the table view to really click the header and move it around, so move the serial and notes headers around. Additionally swap them around (vertically) in the detail section below the table and delete the textfield for the notes and instead drag a NSTextView to it instead and resize it vertically to be bigger.
Now this interface is really good even for a basic application, it obviously has some quirks. For starters Interface Builder lists your attributes in alphabetical order and so the license key and the notes should be switched around in the table and the detail part of the view.
So first off you'll have to double click inside the table view to really click the header and move it around, so move the serial and notes headers around. Additionally swap them around (vertically) in the detail section below the table and delete the textfield for the notes and instead drag a NSTextView to it instead and resize it vertically to be bigger.
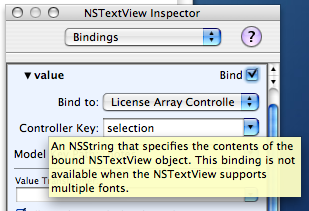 Double click inside the text view and on the inspector pane (make sure the inspector says NSTextView instead of NSScrollView) bind the "value" to the License Array Controller with the controller key "selection" and the Model Key Path "notes."
Lastly change the Window title to "License Keeper" then Save and quit Interface Builder. Go to Xcode and hit the Apple + R key to build and run the application and it should run like in the screenshot below
Double click inside the text view and on the inspector pane (make sure the inspector says NSTextView instead of NSScrollView) bind the "value" to the License Array Controller with the controller key "selection" and the Model Key Path "notes."
Lastly change the Window title to "License Keeper" then Save and quit Interface Builder. Go to Xcode and hit the Apple + R key to build and run the application and it should run like in the screenshot below
 What did we just do?
We accomplished several things today
1. We built a Core Data Application
2. We created and defined an entity
3. We dragged the entity over and prototyped an inteface within Interface Builder
3. We rearanged the interface and binded an NSTextView object to an attribute in our entity
This is a very simple application, but also a very capable one that benifets from Core Data so it has undo, redo, live search and persistence. By default Core Data applications store their data (in non Document based application template) in XML format. Core Data allows you to save your data in XML, SQL (sqlite) or Binary formats and you can change it, but i'll leave that for another day.
Questions? Comments? Think certain parts of this tutorial could be written better? Want me to expand on a certain topic?
Leave a comment here
* at least amongst mac developers as far as I am aware
** aside from the predefined code Xcode auto-generates
What did we just do?
We accomplished several things today
1. We built a Core Data Application
2. We created and defined an entity
3. We dragged the entity over and prototyped an inteface within Interface Builder
3. We rearanged the interface and binded an NSTextView object to an attribute in our entity
This is a very simple application, but also a very capable one that benifets from Core Data so it has undo, redo, live search and persistence. By default Core Data applications store their data (in non Document based application template) in XML format. Core Data allows you to save your data in XML, SQL (sqlite) or Binary formats and you can change it, but i'll leave that for another day.
Questions? Comments? Think certain parts of this tutorial could be written better? Want me to expand on a certain topic?
Leave a comment here
* at least amongst mac developers as far as I am aware
** aside from the predefined code Xcode auto-generates
Saturday, September 16, 2006
Introduction and [Tutorial] Prototyping Interfaces with Interface Builder
Subscribe to:
Post Comments (Atom)


12 comments:
Great idea, the example was easy to follow. I taught myself how to code in java by examining a program. What are your thoughts about teaching how to program using the gradebook program as an example. That could help you to organize your thoughts, and get a lot of feed back as you code. I would love to learn how to program in Cocoa doing something I want to do, rather than converting Fahrenheit to Celsius!
Keep the good work
I enjoyed this tutorial. However, I've installed Xcode 2.4 and Interface Builder 2.5.4 so the binding instructions on the NSTextView aren't the same. I'd like to know if you're using the same version tools. If not can you look at the tutorial using the versions mentioned above.
Thanks!
As I posted in the correction (though I should have edited this article itself) you have to click on the NSTextView and uncheck the "Multiple Fonts Allowed" checkbox.
Otherwise it assumes you are working with NSAttributedString and not a plain NSString. Once you have done that it should work.
Colin, thanks. It worked as promissed. Nice job.
Walt
Thanks a lot, great tutorial with simple yet powerful app for a starter!
good tutorial, nice to have a useful sort of app rather than yet another rather empty one. This one also showed easily how leveraging cocoa frameworks can really give you a lot of bang for the buck. The comment about versions of tools is good -- you would do well to include such details. using the spell checker would be a good thing too. ;-}
I'm looking fwd to checking out your other examples. Are there any books you recommend for learning cocoa, or other www's?
Thanks Ken
I'd start with the links on the right side of the page
in particular CocoaDev and CocoaDevCentral are good places
once leopard is out wait for Aaron Hillegass's 3rd edition of Cocoa Programming for Mac OS X
Thanks for the example. Couple of things:
1) Why are there no dates on the comments?
2) I don't get this:
Next open the MainMenu.nib file by double clicking it in the source list and drag the window (height wise) to be bigger by a few inches. Now (heres the tricky part) just click the data model window and move it over so you can see the window in Interface builder and the entity in the data model. Got it? Good.
Could you say where the 'window' in the 1st sentenence came from?
3) Update this for IB 3?
Thanks a ton
Eric
(1) Im not certain why there are no dates on the comments - i'll have to look at bloggers settings
(2) The Window I am referring to is the only window that comes up in Interface Builders instances and is the window that is presented to you blank for you to begin dragging widgets to
(3) Yes I should update it for Interface Builder 3 - I can't make any guarantees when i'll get around to that as it's getting near the end of the term for me but I have some free weekends coming up so I'll try and do that in the near future assuming I am not swamped with homework
Thanks on all 3 points. I can't wait to try out the updated tutorial. :)
Also, I know you said that you don't have much time, but on the 'confusing' steps, might you add a screen capture or two?
Again, thanks.
Eric
Awesome:
What an instant gratification start for my app. However as sweet as this is i been pulling my hair out for 3 days trying to figure out how to implement drag and drop ordering of rows. Not columns but rows. Closest thing iv found to getting this working is found here.
http://www.red-sweater.com/blog/274/a-moveable-beast
The method described on that page almost works but falls short of actually moving the files. Im not quite sure what (Update rick fillion) means.
Just awesome.
Post a Comment